Attempting Automated Fraud Analysis on Edgar 10Q filings using SEC EDGAR ftp, Python, and Benford’s Law

The purpose of this post is to describe a side project I did to analyze SEC filing in an attempt to spot irregular values in 10Q filings.

Background

Benford’s Law
Benford’s law is a well known natural phenomenon discovered many many years ago in 1938 by physicist Frank Benford. Under certain key assumptions it relates that the probability distribution of the occurrence of the first and second digits of a list of numbers spanning multiple digits have been observed to follow a well observed distribution. Now for the statisticians out there there are key assumptions in which this natural 1st and 2nd digit distribution observation is valid and other cases where this is invalid. Often times folks will take these assumptions for granted and use Benford’s Law as a hard test when really its application in accounting has been a flag or notification that something should be further investigated. For example we shouldn’t be using Benford’s Law when the list of digits under investigation is too small (e.g. 11, 55, 155, 499) because the occurrence of the  leading digits will be more biased. We will delve more into this importance later.

Edgar SEC:
Edgar stands for Electronic Data Gathering, Analysis, and Retrieval system. It is the digital collection of SEC filings where a user can pull up financial files of any company they desire and these documents are all publicly available. There are two means of access. One can use the Edgar SEC webpage to manually pull files or utilize their ftp service to more systematically retrieve files.

Edgar Central Index Key:
The SEC does not want bots constantly pinging their servers and retrieving files for good reason. This would create a load balancing nightmare. So to allow their servers and users to still retrieve information programmatically they created the Central Key Index or CIK. The CIK is a unique identifier foreign key that is ascribed to a company. For example if I wanted to download all the financial documents of Lehman Brothers I would first have to know the CIK that corresponds to that company. Once I have the CIK I can then use that key in the ftp to programmatically retrieve all past documents and current filings (which doesn’t make sense because Lehman Brothers no longer exists).

10Q Filings: 
10Q filings are on of many files that companies are mandated to publish to the SEC in order to comply as a publicly traded company. Among these files are the quarterly earnings, expenditures, internal tradings, and other files. The 10Q files are of particular interest because often contain data that companies must publish and yet are not audited. 10K files on the other hand are annual files that contain expenditures, capital costs, cash flow, etc.. that are audited. This makes 10Q files more ripe for embellishment because there is pressure to meet quarterly expectations and the documents are not thoroughly audited compared to 10K files.

Training Dataset
There are known incidents of fraud all throughout the history of the stock market. The best part is that all these companies had to file SEC documents before, during, and after these incidents became known. So fraudulent companies like Enron, etc.. have known dates and readily available filings, in this case we were interested in 10Q filings, to serve as our “training” data set. I created a list of 10Q files corresponding to companies at a particular point in time known to have been conducting fraud.

Thesis
We will create a list of known 10Q documents pertaining to a period in time when companies that were audited and deemed to be conducting fraud. We will conduct Benford’s law on the numbers in these documents and compare their distributions against companies not identified as fraudulent in the same time period. We will try and use a diversified group of companies for both training and test groups. Ideally we would like to obtain an idea for the rate of false positives and true positives to understand the predictive ability of our small algorithm.

Method
All code is publicly available at my local github account.

Download SEC Indices
I successfully downloaded all SEC CIK’s into the form of a SQL database on my local drive.


def FTPRetrieve(Primary, Path, SavePath):

    import ftplib
    server="ftp.sec.gov"
    user="anonymous"
    password="YouEmailAddress@gmail.com"
    try:
        ftp = ftplib.FTP(server)
        ftp.login(user,password)
    except Exception,e:
        print e
    else:
    #edgar/data/100240/0000950144-94-000787.txt
        ftp.cwd("edgar/data/" + Primary + "/")
        try:
            ftp.retrbinary("RETR " + Path ,open(SavePath + Path, 'wb').write)
            #ftp.retrbinary("RETR " + filename ,open(filename, 'wb').write)
            ftp.quit()
        except:
            print "Error"

import sqlite3
import csv
import glob
def tosqlite(file):
    with open(file) as f:
        idx = csv.reader(f, delimiter='|')
        for row in idx:
            cur.execute('INSERT INTO idx (cik, cname, form, date, path) VALUES (?, ?, ?, ?, ?)', row)
 
#con = sqlite3.connect('~/DSTribune/Code/EdgarIndex/edgaridx.db')
con = sqlite3.connect('edgaridx.db')


with con:
    con.text_factory = str
    cur = con.cursor()
    cur.execute('DROP TABLE IF EXISTS idx')
    cur.execute('CREATE TABLE idx(Id INTEGER PRIMARY KEY, cik TEXT, cname TEXT, form TEXT, date TEXT, path TEXT)')
#    for idxfile in glob.glob('~/DSTribune/Code/EdgarIndex/*.idx'):
    for idxfile in glob.glob('*.idx'):
        print idxfile
        tosqlite(idxfile)

Download 10Q Training and Test Data sets:
From there I identified the companies I knew to have been fraudulent within a given date range. I observed that the years 2001 – 2004 contained a high frequency of known filing fraud and so focused on this time period. This would be my training dataset.


import sqlite3
import re
from FTPEdgar import FTPRetrieve
from ExtractNumbersV2 import BenfordsLaw

from datetime import datetime

tstart = datetime.now()
print tstart

#The following file paths are examples of locations that I locally saved my sqlite database, change to a place you see fit!
SavePath = r"/home/PycharmProjects/Edgar/EdgarDownloads/"
LedgerPath = r"/home/PycharmProjects/Edgar/"
conn = sqlite3.connect(r"/home/Code/EdgarIndex/edgaridx.db")
c = conn.cursor()
#------------------------------------------------------------------------


#Companies found to be fraudulent during period of study
#ENRON: 72859    (2001)
#Waste Mang: 823768   (1999)
#Worldcom: 723527   (2002)
#TYCO corp: 20388   (2002)
#HealthSouth 785161   (2003)
#Centennial Technologies 919006
#Peregrine Systems Inc 1031107   (2002)
#AOL: 883780
#AOL TimeWarner: 1105705   (2002)
#Adelphia Communications Corp: 796486   (2002)
#Lehman Brothers Holdings Inc: 806085   (2010)
#AIG: 5272   (2004)
#Symbol Technologies: 278352  (2002)
#Sunbeam Corp: 3662  (2002)
#Meryl Lynch and Co Inc: 65100
#Kmart: 56824    (2002)
#Homestore Inc: 1085770   (2002)
#Duke Energy Corp: 1326160   (2002)
#Dynergy: 1379895   (2002)
#El Paso Energy Corp: 805019   (2002)
#Haliburton: 45012   (2002)
#Reliant Energy Inc: 48732  (2002)
#Qwest Communications: 1037949   (2002)
#Xerox:  108772     (2000)
#Computer Associates: 356028   (2000)
#Unify Corp: 880562   (2000)

#compList = [72859, 823768, 723527, 20388, 785161, 919006, 1031107, 883780, 1031107, 883780, 1105705, 796486, 806085, 5272, 3662, 65100, 56824, 1085770, 1326160, 1379895, 805019, 45012, 48732, 1037949, 108772, 356028, 880562]

#Companies not idetnfied as fraudulent during period of study

#Intel:  50863
#Microsoft: 789019
#Starbucks: 829224
#Walmart: 217476
#Amazon: 1018724
#Qualcomm: 804328
#AMD Inc: 1090076
#Verizon: 1120994
#Ebay: 1065088
#Home Depot: 354950
#Geico: 277795
#Costco: 734198

#compList = [50863, 789019, 829224, 217476, 1018724, 1090076, 1120994, 1065088, 354950, 277795, 734198]
compList = [1321664, 92380, 18349, 1127999, 1171314, 78003, 789019, 91419, 716729, 318154, 814361, 318771, 796343]


for company in compList:
    for row in c.execute("SELECT * FROM idx WHERE form = '10-Q' AND cik = '" + str(company) + "';"):#"' AND DATE(substr(date,1,4)||substr(date,6,2)||substr(date,8,2)) BETWEEN DATE(19960101) AND DATE(20040101);"):
        print row[0], row[1], row[2], row[3], row[4], row[5]


        ID = str(row[0])
        Primary = str(row[1])
        Company = str(row[2])
        Document = str(row[3])
        Date = str(row[4])
        MyPath = str(row[5])
        MyFile = re.search('\d+-\d+-\d+.txt',MyPath).group()
        #print ID, Primary, Company, Document, Date, MyPath, MyFile

        try:
            FTPRetrieve(Primary, MyFile, SavePath)
        except:
            print "could not find " + Company
        else:
            BenfordsLaw(LedgerPath,SavePath,MyFile,Company,Date,Primary,ID,Document)

    #c.execute("SELECT * FROM idx WHERE form = '10-Q';")

    #print c.fetchall()
    tend = datetime.now()
    print tend

c.close()

Analyze each file after subsequent download:

While our system is downloading these 10Q filings (There are rate limits) we can actually use Python to simultaneously parse and analyze all numbers of interest within each 10K filing. This allows us to ping EDGAR at a sustainable rate while using that same cpu power to parse, analyze, and record results in a csv file. By combining the downloading and analysis on the same cpu we open the door for multiple instances or batch jobs if we want to do larger scale analysis in the future.

def BenfordsLaw(LedgerPath, SavePath, filename, Company, Date, Primary, ID, Document):

    import math
    import scipy.stats
    import numpy as np

    #Find values only with commas
    import re
    RawList = [re.findall(r'\d+[,]\d+',line)
        for line in open(SavePath + filename)]

    NoEmpty = filter(None, RawList)
    DeleteIndex = []
    AddIndex = []
    #Then remove those commas
    Counter = 0
    for item in NoEmpty:
        Counter += 1
        if len(item) > 1:
            for targetElement in range(1,len(item)):
                AddIndex.append(item[targetElement])
            DeleteIndex.append(Counter - 1)


    NoEmpty = [i for j, i in enumerate(NoEmpty) if j not in DeleteIndex]

    CleanNoEmpty = []


    for i in NoEmpty:
        CleanNoEmpty.append(i[0])

    FinalList = CleanNoEmpty + AddIndex

    CleanFinalList = []
    numDist = [0,0,0,0,0,0,0,0,0]

    for item in FinalList:
        CleanFinalList.append(item.replace(',', ''))


    counts = []
    CleanFinalList2 = []
    for number in CleanFinalList:
        # i = "An, 10, 22"
        last = number[-1]
        secLast = number[-2]
        pop = number[1]
        # pop = 'n', the second character of i
        if int(pop[0]) != 0 and last != 0 and secLast != 0 and len(number) >= 4:
            counts.append(int(pop[0]))
            numDist[int(pop)-1] = numDist[int(pop)-1] + 1
            CleanFinalList2.append(number)

    print CleanFinalList2
    print counts

    def Benford(D):
        prob = (math.log10(D + 1) - math.log10(D))
        return prob


    chi2, p = scipy.stats.chisquare( counts )
    msg = "Test Statistic: {}\np-value: {}"
    print( msg.format( chi2, p ) )

    from scipy import stats
    from scipy.stats import ks_2samp
    PList = []
    DList = []
    unifPList = []
    unifDList = []

    xk = np.arange(10)
    xk = xk[1:10]
    unifxk = np.arange(10)

    pk = (Benford(1), Benford(2), Benford(3), Benford(4), Benford(5), Benford(6), Benford(7), Benford(8), Benford(9))
    unifpk = (0.1197,0.1139,0.1088,0.1043,0.1003,0.0967,0.0934,0.0904,0.0876,0.0850)
    custm = stats.rv_discrete(name='custm', values=(xk, pk))
    unifCustm = stats.rv_discrete(name='custm', values=(unifxk, unifpk))

    IterCt = 1000
    for iter in range(IterCt):

        R = custm.rvs(size=len(counts))
        R = R.tolist()
        placeholder = ks_2samp(counts, R)
        PList.append(placeholder[1])
        DList.append(placeholder[0])

        unifR = unifCustm.rvs(size=len(counts))
        unifR = unifR.tolist()
        unifplaceholder = ks_2samp(counts, unifR)
        unifPList.append(unifplaceholder[1])
        unifDList.append(unifplaceholder[0])

    AveP = sum(PList)/IterCt
    AveD = sum(DList)/IterCt

    unifAveP = sum(unifPList)/IterCt
    unifAveD = sum(unifDList)/IterCt

    DistPercent = []
    for i in numDist:
        DistPercent.append(float(i)/float(sum(numDist)))

    print DistPercent
    print AveP
    print AveD
    print unifAveP
    print unifAveD

    output = [AveP, AveD, unifAveP, unifAveD, len(counts), Company, Date, Primary, ID, Document]

    #This script needs to be run twice. Once for the training set and once for the test set.
    #fd = open(LedgerPath + "NonSuspected.csv",'a')
    fd = open(LedgerPath + "NonSuspected.csv",'a')
    for column in output:
        if isinstance( column, int ):
            fd.write('%.8f;' % column)
        else:
            fd.write('%s;' % column)
    fd.write('\n')
    fd.close()


The script above exports the results of the analysis as a csv. We run it once for the training dataset with known fraud and once again for the test list or companies not identified as fraudulent. The way we ascertained if the distributions of the 1st and 2nd digits followed the known Benford 1st and 2nd digit occurence distributions was to conduct a chi squared test of independence to determine the probability that the two distributions come from the same process. The null hypothesis is that the two distributions are independent of each other while the alternative hypothesis is that the two distributions originated from the same process and are not independent but are related. If the two samples are unlikely to be produced given the null hypothesis (they were created independent of each other) than we would expect a low probability or p-value under the null hypothesis. Often the scientific community will use a p-value of 0.05 or 5% as a rule of thumb however this will depend on the area of study as these p-value or significance thresholds can be empirically derived. What I am more curious about is if the distribution of p-values comparing the fraudulent vs. non-fraudulent group differs significantly for both the 1st and 2nd digit.

Results

Edgar_PMF_1stDEdgar_PMF_2ndD

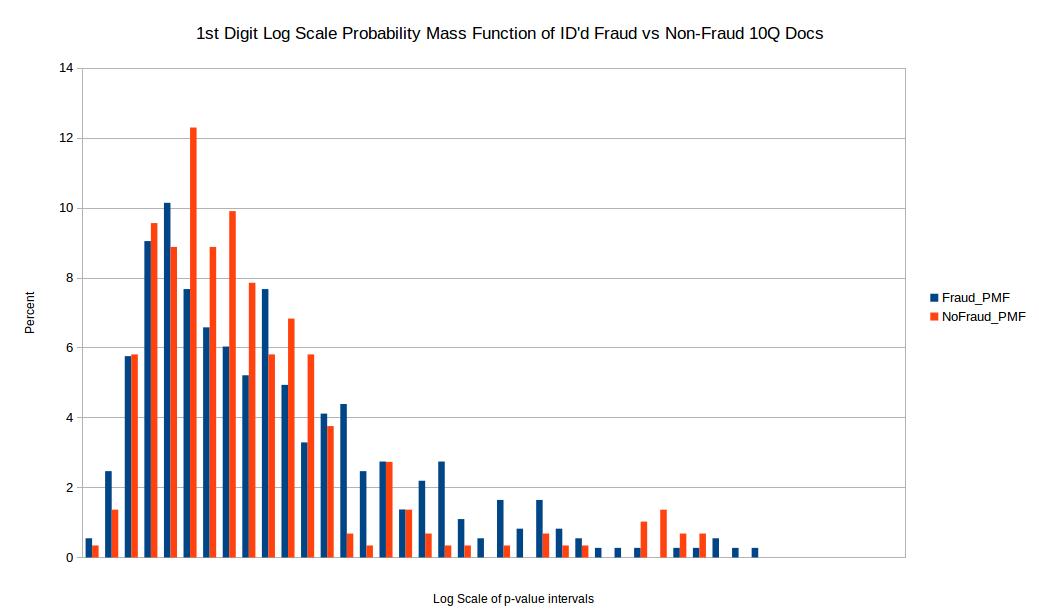
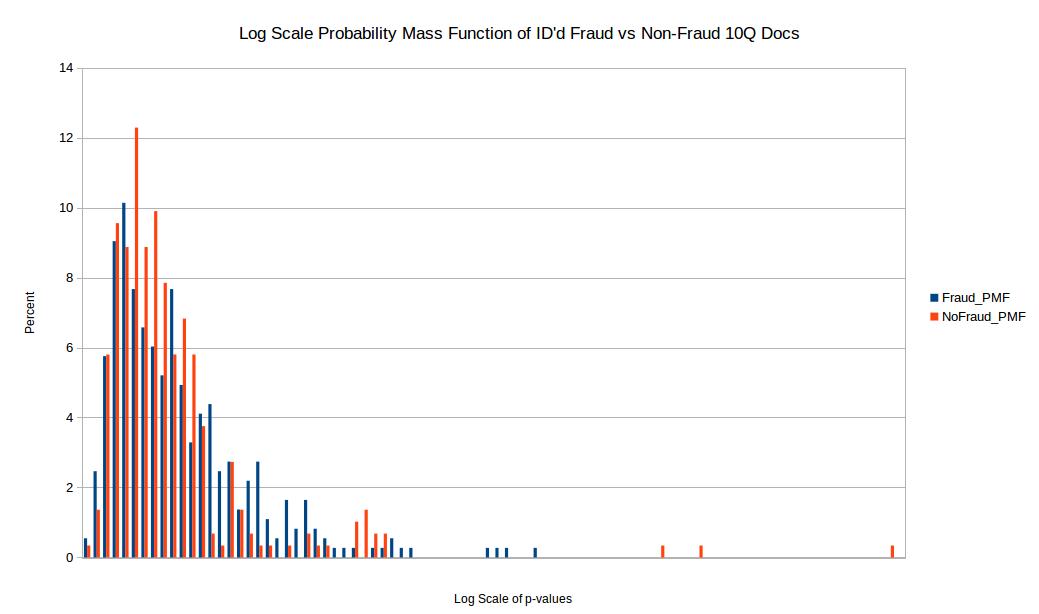
Before comparing the two samples I first eliminated p-values where the quantity of valid numbers within each filing were below 100 in order to eliminate any bias from small quantities of numbers in each filing. In order to compare the distribution of p-values for the chi squared comparison test I took a log scale base 10 of the p-values for both test and training set. I then setup intervals of 0, -0.5, -1, -1.5 all the way to -42 in order to create a probability mass function or PMF. The reason I wanted to do a PMF is because when directly comparing two distributions one should not compare histograms directly if the sample size for both samples are not exactly the same (which is often not the case). So to make up for this I took the percentage within each log base 10 range (0.5 increments) and created a PMF as seen above. Unfortunately the results come back pretty inconclusive. I would have hoped for two distinct and easily separable distributions however these results don’t visibly show that.

Conclusion
While Benford’s law is very powerful it may not be appropriate for 10Q documents. For one the algorithm works better on raw values and many of the values in the 10Q documents may be sums or output that resulted from operations on raw values. I think that Benford’s would work better on raw accounting logs that have more transaction data. Also I ran into a lot of numerical data points in 10Q files that were merely rounded estimates. I did my best to eliminate these in python. Finally Benford’s law works best when there is a wide range in the # digits.

Future
I think there is still potential to programatically analyze EDGAR files however 10Q files may not be close enough to the metal of company accounting necessary for the job. I am open to ideas though in the spirit of this analysis.

~Mr. Horn

Creating the World’s Most Accurate Solar Rate Analyzer

GBPVWattsOpenEI

Over the past two months I have been working on and launched the world’s most accurate solar rate analyzer. It was featured by the ex-CTO of the White House and received some excellent press. You can play with the Solar Residential Rate Analyzer here. What makes this application novel is that it combines three really tough pieces of assessing solar payback. I combined Green Button Data, PVWatts, and Open EI’s Utility Rate Database into a single application to allow prospective solar customers to type in their address, upload their green button data, size their solar system, and see their new utility bill after solar. Below are the explanations of these three parts.

1) How much energy does your house consume?
If you were to receive an estimate from a contractor on your payback the best they could do is ask for your monthly bill and maybe give you an estimate of what you might be shaving off. The problem here is that even the more sophisticated contractors won’t even go that in depth and you will most likely get a generalized estimate of how much you will save. Here in lies Green Button Data. Green Button Data is an international standard that utilities voluntarily participate in allowing customers the ability to access their hourly smart meter data and grant access to that hourly consumption data as far back as 13 months. Also instead of downloading the data in a green button file format customers can also use Green Button Connect, an initiative that the three major IOUs in California have adopted already, to a validated third party to access this hourly data in perpetuity (or as long as the customer lives there). Here is a link to the Green Button Initiative and all the utilities currently supporting or pledging to support the standard.

2) How much solar insolation is available at your house?
If your home is the desert of Anza Borrego or the fogy mornings of San Francisco Bay the amount of solar insolation or solar resource available will vary. Fortunately the good folks at the National Renewable Energy Lab (NREL) have developed an API to calculate the amount of solar insolation and hourly AC productionof your solar panel given a few parameters including the latitude and longitude (or address), azimuth and tilt of the solar panel, and system size. This makes for an incredibly powerful and convenient method of calculating hourly kwh production. Here is a link to the NREL PVWATTs API.

3) I get it solar chips away at my net consumption. I still have no idea how this translates into my monthly utility bill.
Lets start with basics first, the typical default utility rate structure is a tiered rate structure where if you use more than X kwh allotted to you in that month you get bumped into Tier 2 where it cost more per kwh than in Tier 1. So if your house is an energy guzzler with air conditioning and a pool pump and you are in tier 4 getting charged at 32 cents a kwh it would be in your interests to shave off enough of your consumption to get back into Tier 2 where you might be getting charged 18 cents per kwh. The US has a lot of utilities that range from investor owned, to COOPs, to Municipality owned. Each one has their own unique surcharges, unbundled rates, and they update these rates almost every month often unpredictably. The DOE has recently given it stamp of approval to Open Energy Information’s (Open EI) Utility Rates Database API. This is an incredible service available to the public operated and run by Dr. David Loomis at Illinois State University. It allows one to access the the rate structure and tariffs of almost every utility in the U.S through their API. The API is very flexible in that it allows one to digest Time of Use, Tiered, and Tiered Time of Use date in a matrix format that accounts for differences in weekends and weekdays.


Back to Basics: Data Science Applied and Theoretical

datasci
One of the awesome data prediction projects I had the privilege of working on as of late is helping the Department of Energy and Lawrence Berkeley National Laboratory improve their Home Energy Score (HES). This single value metric which ranges from 1 – 10 judges the performance of the energy efficiency of a given home regardless of user behavior. In other words this scoring system allows new home buyers to look at household energy performance based on this score without having to take into account the prior users’ behavior. HES is a relatively simple scoring system compared to the California Home Energy Rating System (HERS). I needed to conduct predictive analysis based on the HES features to predict HERS outcomes and find out if the simpler HES model captures the variability of the more complex HERS model.

Click below to see the Home Energy Score Viability Report
Home Energy Score Predictive Analysis

I ended up using Multi-variate Linear Regression, Random Forest, and Support Vector Machines using a repeated 10-fold cross-validation as my resampling method. I read up on the book “Applied Predictive Modeling” and gained more appreciation for the importance of pre-processing. Why the skew of the distribution matters for model A, why multicolinearity can hamper multi-variate regression but not decision trees. I also expanded my modeling toolbox to include more complex methods including Support Vector Machines (SVM) and single layer neural networks.

I highly recommend Applied Predictive Modeling and see the link below:

Applied Predictive Modeling – by Max Kuhn and Kjell Johnson

Other interesting books I’ve been reading lately:

Doing Data Science – Straight Talk From The Frontline – by Cathy O’Neil and Rachel Schutt

Programming – Collective Intelligence – by Toby Seagran

Data Analysis Using Regression and Multilevel/Hierarchical Models – by Andrew Gelman and Jennifer Hill

Google Fusion Table Maps And Javascript: The Power

fusion_tables_logo_beta

The challenge for displaying maps online is the how. How are we going to place a map online for viewers to interact with the data quickly, snapily, and do it at low cost. While boxed solutions exist such as Tableau and ESRI Arcserver both have their respective Pros and Cons.

Tableau: Tableau costs money, however it is a great piece of software to easily display spatial data from a database such as Access, Excel, or a .dbf. I have noticed that tableau maps are not as snappy as Google Fusion Maps. For example the ability to zoom in and click on a zip code within a state map is nowhere near as easy or natural as a Google Fusion table. So Tableau is preferable if you have the budget and don’t really need to zoom in or interact within the map itself.

ESRI Arc Server: Esri’s Arc Server has many strengths if you are already working in the Arc Map environment and have lots of .shp files in your library. One of the nice features is that you can easily set what the map should look like when you zoom in at different levels. This is possible with Google Fusion Tables/Maps however you need to know some Javascript for the functionality. The potential downside of Arc Server is that it also costs a bit of money and you will need to update your Arc Server occasionally which can be tedious if you have live maps already up on your site using older versions of Arc Server. Not to mention I have noticed Arc Server displayed maps don’t feel anywhere near as snappy or alive as Google Fusion Tables.

Google Fusion Tables: The benefits of Fusion Tables is that it is a free service provided by Google. You don’t need to pay to use/display maps on your website. This makes it a key candidate for Non-Profits, Academia, Hobbyists alike. It is incredibly snappy. When you zoom in on a map you are running on top of google maps so everything feels native and looks natural. The real challenge with fusion tables, if you want to go beyond displaying a simple map, is learning some javascript. If you simply want to display a map where a user can click on a polygon and see a pop-up with information then you don’t need to learn Javascript, you can simply do one Google Fusion Tables tutorial and start working. If you want to build a more interactive map with a timeline bar where you can scroll from 1990 to Present or change the polygons from zipcodes to counties then you will need to learn some javascript and html5. I prefer the the Google Fusion Table approach because the map products look incredibly professional and interactive and the learning curve is an obstacle that is worth overcoming in this case.

IPython: Exploratory Data Analysis

IPy

If you are like me you typically use R to handle all your in house data analysis (you may also use other programs like STATA, SPSS, etc..). I will attempt to make the case that Python and IPython, which stands for interactive Python, can fill those roles of data exploration, charting, and analysis. What the heck is IPython? Let me demonstrate

In Python we usually have this pattern of write, compile, run. So if we wrote a long script we would have to run the entire script each time, making it difficult to debug and laborious to explore line by line our data. IPython, short for Interactive Python, allows you to run Python code line by line. If you are doing data analysis and are familiar with software like R I highly recommend IPython because it allows you to quickly debug something as simple as writing the correct file path for your .csv file.

HTML5 + CSS + Javascript

CSS Javascript HTML5

We all have, or think we have, really great ideas that hit us in the shower. That revolutionary customer facing web application that could change the industry. So what do we do next? We go out and find someone to build it for us. Err. Wrong. We outsource our project to someone who is well trained. Well technically yes this might work very well and affordably, however what happens when you want to make an addition to the web app. What happens when you are waiting days to weeks for this person to e-mail you back. This is the conundrum that would be entrepreneurs and problem solvers face when trying to go from idea to fully functioning online solution.

In my experience if you want to get it done right you have to do it yourself and do it myself I will. That means understanding, appreciating, and learning the building blocks of the web. Why learn this scary language? What value added does a web application bring to any company? Don’t I need to hire a computer science major to do this stuff? The answers respectively are “Its fun”, “a ton”, and “don’t need one”. Take a look at the class requirements for a Computer Science major. Odds are you will see classes like “Intro to Java”, “Object Oriented Programming”, “Memory Management”. The truth is that present day web development languages and best practices aren’t even taught to CS majors (academia is slow to change their rubric, who wants to update their PowerPoint anyhow?). So if you aren’t a CS major remember that you are starting out at the same level as a new graduate. A great free resource to start learning HTML5, CSS, and Javascript is w3schools.com. You don’t need to download any special programs or read any books, you can build the elements of webpage within the site.

This past week I attended a two hour Meetup learning session in San Francisco called Startup Saturdays – IT Training and Entrepreneurship Academy. We went over the basics of HTML5, CSS, and JavaScript. I highly recommend going to your local meetup as every major city will have an HTML group as well as a group dedicated to learning JavaScript. I signed up for the San Diego local groups and there are quite a bit of offerings. The reason to learn these sets of languages are that HTML tells the browser what is being displayed, CSS makes it pretty, and JavaScript makes it interactive and alive. JQuery offers a community built library for common JavaScript tasks. So the next time you have a great idea don’t go running to find someone to build it for you. At the very least understanding the basics of how to build your own site will allow you to speak intelligently with experienced web developers in the same way knowing what your car alternator is when speaking with a car mechanic. Chances are it is something you can do yourself or it takes a lot less time than originally estimated.

PostGIS: A Robust GIS Solution for PostgreSQL Data

PostGIS
This week my development improvement focused on PostGIS which is a way to conduct spatial analysis using SQL on data stored in a PostgreSQL database. The advantage of using PostGIS over desktop GIS applications including proprietary software from ESRI Arcmap or open source Quantum GIS is the ability to work at scale and native relational database support. The normal order of operations for spatial analysis is to first retrieve the data using SQL, export as a csv, import into third party software, geocode addresses, and start spatial analysis. With PostGIS every step from start to finish, even the query itself, is built into PostGIS. Desktop GIS software stores spatial data as a flat file called a shapefile. This is great for a single user to access however it does no support multiple users or applications calling this spatial data at the same time. This is where PostgreSQL and PostGIS shine as they allow for concurrent user access using a commercial opern source solution. The key differences between this second and first generation GIS solution is explained well in this PostGIS introduction. In summary PostGIS offers tremendous automation, speed, and consistency in spatial analysis on a large data set in PostgreSQL.

For learning how to begin I went where all the forums pointed to, Boundless: Introduction to PostGIS. I completed the first few examples using the Open Geo Suite and there is a lot to learn. However if you are already familiar with SQL and spatial analysis concepts such as projections, spatial joins and buffers then the real learning curve is a change in approach. Rather than seeing spatial analysis as a single step in a chain of data preparation steps one is now integrating all those steps into a SQL based approach and can be automated using Python functions. A standard database has data types of string, numeric, and Date/Time Stamp. PostgreSQL is a community driven relational database and is also extendable so that additional datatypes such as spatial based entries are allowed. I believe that PostGIS is well suited for dealing with dynamic spatial data stored in a relational database while desktop GIS software is better suited for one off projects where the data sources are already in shapefile format and users are not concurrently accessing this spatial data.

SQL using VIM text editor

SQL

SQL or structured query language is a useful relation-based structure that allows one to go query the raw data and then work analysis magic on that data. I decided to brush up on my SQL skills and completed the exercises on Learn SQL The Hard Way. While I was brushing up I decided to also learn a new text editing style / editor called “VI” which shares much in common with the text editor “VIM“. Vi is built into all unix-based machines so that alone makes it very useful. Also compared to other editors such as Nano that are built into the console Vi integrates commands that allows one to write code more efficiently. Specifically Vi allows ones finger to never leave the keyboard when writing code. The advantage may not seem apparent to those used to using a keyboard and mouse together to write code, but to those who code more frequently Vi/Vim offer a lot of benefit in time and ease.
For those who have heard of SQL pronounced (“Sequel”) but aren’t sure of the core of this language. The core four functions are rather basic and if you have used excel you can use this analogy. Everything consists of tables. So a sequel database is much like your excel workbook. Each tab in the workbook is a table in the database. Rows and Columns in excel are Rows and Columns in SQL. There are four core methods in SQL called “CRUD”:

Create – add data into tables
Read – read data from tables
Update – update data in tables
Delete – delete data from tables

Machine Learning Using Scipy

This week I have focused my energy on learning machine learning tools using the Python package Scipy. I purchased the book Building Machine Learning Systems with Python and have complete about half of the exercises. The take away message is that there are two kinds of statistical models. Heuristic models and Machine Learning models.

Here is an example I made up demonstrating the difference:

We own an ice cream shop and want to predict the best days, locations, and time to sell ice cream. So we make a heuristic statistical model that takes into account past sales using locations we sold, temperature, and time of sale. We model these parameters against # Ice Cream Cones sold which is our y or dependent variable. At the end of our model we find out that higher temperatures, afternoon hours, and areas of high traffic are all positively correlated with # Ice Cream Cones sold. On the plus side we have a deeper understanding of how the variables affect the outcome (ice cones sold), however on the negative side we trained our statistical model on all our past sales and we may have over-fit our model. This means our model is not very robust and if we are selling ice cream on an especially hot and busy day our model will not properly estimate the # ice creams sold because the majority of days that our model was trained on fell on moderately temperate days with moderate foot traffic. This is bad because if we know ahead of time the warmer than usual conditions and foot-traffic we want to bring enough gallons of ice cream to meet demand properly.

This is where Machine Learning comes in handy. Machine Learning uses the hold-out method which sets aside part of our past ice cream transactions and does not train our model on these ice cream sales. We then create a plethora of ice cream sale models and test each model’s accuracy on the creamy transactions that we left out of our model training. You see most models predict accurately on data points that the model was trained off of. But when it comes time to test on new data these models are really being put to the test. By holding out ice cream sales and testing it on the model we are simulating the act of introducing new data that hasn’t been trained on before. We can also choose the model that performs best on this untrained data. So if we have an unusually warm and busy day we can implement our machine learning algorithm to more accurately predict ice cream sales that day and come prepared with X amount of gallons of ice cream. Delicious I know!

Highcharts and Django

GB_APP

This week I have been busy making the skeleton of my Green Button app. The idea is that a user can enter in their Green Button data which contains their 15 minute energy usage profile along with their address, heating source, and desired solar panel specs to see how much they could be saving by switching to solar. Once the user submits their Green Button data NRELs PVWatts application calculates the predicted energy produced onsite using the address and this is subtracted from the energy logged in the Green Button data. Depending on the utility provider of the user’s energy savings is estimated based on the tariff structure of that utility.

I created the framework in Django along with the file submission and reading functionality. The front-end is a chart using the Highcharts API. I threw in some mock data to make sure that the charts were working and I also have the file submission working properly now. The majority of the work left is to create forms to enter a user’s address and heating source. There is more work needed on the calculations and PVWatts integration. In the past I have worked on projects like creating video games where I started with code (back-end) and delayed the animations and visuals (front-end) until later. I now know better and am working on both the front-end and back-end simultaneously as they often have to conform with one another, rather than one of these concepts being an afterthought.